Sunday 13 September 2015

Alcohol Inks

I have been given a gift of some Yupo paper this week, and have been playing with my alcohol inks. Yupo is a synthetic watercolour paper, made of polypropylene, it is smooth, matte and non-absorbent so perfect for alcohol inks. 

I found a lady on YouTube who creates Dreamscapes with Yupo and alcohol inks. Her name is June Rollins, here are some of her artworks:


Guess what, no brushes needed!
If you have alcohol inks, but no Yupo, you can try the techniques on Glossy paper instead, it works fine!

If you have no alcohol inks, why not try creating a similar Dreamscape scene using watercolour paints. Be brave with your colour choices.

Here are the two videos I found the most helpful:

A couple of other ideas I figured out:
  • use a straw to blow ink or the alcohol around
  • use a toothpick to apply ink or alcohol in fine lines

Here are my Yupo paper Dreamscapes. They are sized 15.5 x 11.5 cm (quarter of A4):

Colours I used: Sunset Orange, Butterscotch, Aqua, Mermaid, Stream, Lettuce, Wild Plum, Cranberry, Eggplant and the Metallic Mixatives Gold and Silver.

 and this is my first practice go, done on glossy cardstock

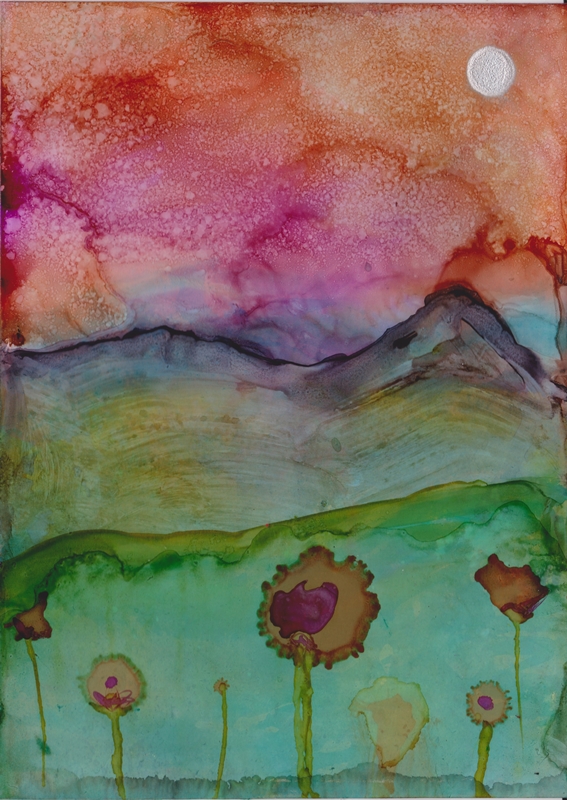
You can see the difference the Yupo makes to the vibrancy of the inks. 
I still have another whole piece and a half of Yupo left to play with.

Saturday 5 September 2015

Art Prompt: Use your fingers

This month I am going to encourage you to put the brushes away! Let's experiment with different ways of getting colour onto journal pages.... with our fingers. 

SAFETY NOTES: 
  • Some art products contain toxic ingredients, always read the labels for safety warnings that recommend avoiding skin contact.
  • Always wash your hands well with warm water and lots of soap after your art session. Use a nail brush to ensure nothing is left around your nail beds.
  • If you have sensitive skin, wear latex gloves.
  • You can use a silicone-based barrier cream before getting your hands painty (e.g. Winsor & Newton Artguard or Avon Silicone Glove Hand Cream)

OIL PASTELS

Oil Pastels are probably my favourite medium to use with my hands. They don't create dust like chalk pastels do and even though there is a noticeable difference between the cheap ones and the expensive, for playing in an art journal the cheap ones are awesome!
Grab a big $5 box from art section of a discount store and get colourful. I love how I can create seamless transitions from one colour to another. If your pastels aren't blending smoothly (sometimes happens with the cheap ones) dip your finger into a bit of baby oil will help. You can also use paper stumps and tortillions to blend smaller areas of colours.


Because they aren't a wet medium, you can use them over more delicate surfaces, like the book pages in the videos above. They are also opaque, so will cover anything that is underneath them. They can be layered on top of each other and then removed strategically to create patterns or an image (called the Subtraction Method).
If you want to put something over the top of them, use acrylics or oil paint. Water-soluble mediums won't stick to oil pastels, and you can use this feature to your advantage:


Until next time,
Happy Arting!


Sunday 23 August 2015

Art Prompt: Terrific Texture

I love texture! We usually think of texture as something we feel with our sense of touch, but in art texture is also something that we can see. The artist I think of when I think 'cool texture' is always Christy Tomlinson. Her art is free and playful and happy. She doesn't over-think, she seeks beauty in imperfection and she uses her hands. Love her style!

This video shows her creating a canvas, but the texture techniques she uses are so great to use in your art journals. A collage of ripped paper, random stamping and some finger painting brings instant interest.

Enjoy the video:

The Prompt for this week is: Flowers.

Saturday 15 August 2015

Art Prompt: Paint the Rainbow

Hello Artists!

Finally back with you after a week of 'flu confined me to bed. Several different prescription medicines later I am approaching human. I even managed to sit upright long enough to start this page in one of my journals:
I love that Prima stencil!

For this week's Journal Journey Prompt, I am sharing one of my favourite videos from Donna Downey's Inspiration Wednesday series. She uses Gelatos to make a beautifully colourful background and adds a really great quote: "Too much ego will kill your talent"

Share your journal page based on this week's prompt in the Facebook Community. Look forward to seeing you there. 

Until next time,
Happy Arting!

Wednesday 29 July 2015

Monoprinting

A brief history of mono-printing and some technical information.


** Psst! If you don't have a brayer go to the hardware store and grab the cheapest foam paint roller that you can find (a small one), it will work just fine!**

Free and Easy Mono-printing Methods

1. Plastic Bag Printmaking with Alisa Burke:
VIDEO https://vimeo.com/79070572

2. Mono-printing with recycling. Any smooth, non-porous surface can be used as a mono-printing plate. Things I have used include: plastic packaging from stamp sets, plexiglass,a glass cutting board, glass from a photo frame* and a non-stick craft mat. This video demonstrates the basic principle, and suggests other surfaces that are suitable:
 https://www.youtube.com/watch?v=gSlIP9MQ1hk 
 

People have used this technique for hundreds of years, with printing plates made from wood, stone, tile, glass, ceramic, marble, and metal. Have a look around your house and garage and see what you can find that might work.

*Safety First: Leave the glass from a photo frame as a last resort, PLEASE. To make it as safe as possible, use masking tape on the edges and place an X from corner to corner on the non-printing side. Make sure the surface the glass is on is flat, with no humps or dips. There is always a chance that the glass will crack and cut you. 

Gelatin Printing Plates

Because of the soft surface, a gelatin printing plate can pick up more details than a rigid surface like plexiglass. This makes it perfect to use your stencils on. You can make one very inexpensively and kids really love it as well.

Basic Gelatin Plate and How To Use:

 Gelatin & Glycerin Plate: The Hectograph


Download a full PDF with the recipes, instructions for making and storing from the Files section of the Facebook Group.

The Buy-rather-than-DIY Option: A Gelli Arts Plate

PROS:
  • Permanent and Stable
  • Stores at room temperature, no risk of molding
  • Durable, won't wear out
  • Both sides are perfectly smooth
CONS
  • Can be expensive and hard to get outside of America (I paid $70AU for an 8x10 plate approximately 18 months ago. This plate retails for about $30 in the US)
  • Can't be melted down and re-poured if accidentally damaged
The Gelli Arts YouTube Channel is a goldmine of ideas and techniques, no matter what you use to mono-print.

Lots more mono-printing tutorials are saved in this You Tube playlist

One last video that demonstrates the enormous potential in a mono-print series made with paper masks:

Saturday 18 July 2015

My Art Journal Covers

This is a few of my art journals. I work in many different books as well as on loose paper. I am showing these ones to show the variety in their covers.


I use the envelope journal as a kind of keepsake diary, so I want to be able to take it with me if I go away to put ephemera and memorabilia in. I made the cover as simple as possible so it would go in a bag easily. Here is a great Coptic Stitch tutorial: https://www.youtube.com/watch?v=ue52htX3j0k

Here is the tutorial I based the above book on: https://www.youtube.com/watch?v=gyV5RA61tZw


 Here is the tutorial I based the above book on: https://www.youtube.com/watch?v=2EKHEWxm2Nw


Tuesday 14 July 2015

The future of Journal Journey

I am home with a sick child, and the forced break from normal has allowed me to think about where we go from here? I more specifically, Where do I take us from here?
When Journal Journey was born there were three of us to share the load, create lessons and participate in the Facebook group chat. Life being what it is, my fellow Guides had to prioritise health, family and paid work. Now I find myself in the same dilemma.
Returning to full time work was supposed to be a temporary change, but another opportunity has presented itself and I am very excited to be taking on a new challenge in my job. I simply no longer have the time to put together the lessons as they have been.
I am not giving up on Journal Journey! I just want to have more time to participate in the Facebook group because all of you are the reason I enjoy it. So I am not going to be doing the PDFs, I won’t be doing my monthly lesson any more, and the lessons will be considerably shorter.
My new plan is this:
  • Every weekend I will post one technique video and one page prompt.
  • That post will be pinned to the top of the Facebook group for the week.
  • I am encouraging you all to share the Art Journal resources that you are enjoying! Videos, blog posts, tip and tricks, post them all.
This way I can spend some of my weekend PARTICIPATING in the Journey, rather than just writing blog posts. Truthfully, I haven’t Journalled in over a month now, and I MISS IT. This is the reason you haven’t seen anything from me, I haven’t created anything. 
Thanks for understanding! Big hugs...
Jodi.

Saturday 4 July 2015

July Week One and Two: Journal Covers


Halfway through our Journey, and time to turn our attention to the outside of our journals. There are some things that you should consider when planning what to put on your journal covers.

The raw material: What are the covers made of?

MDF (medium density fibreboard) or plywood panels
Give MDF two light coats of gesso to seal the wood. If any moisture gets into MDF it swells and disintegrates. Other than that, you can do almost anything with a wood base because it’s sturdy and inflexible.
Chipboard
Want to recycle? Chipboard sheets from the back of sketchbooks make great covers. Or you can cut cereal box card to the size you need and glue them together. Use a good thick PVA glue (e.g., wood glue) or a gel medium and weight them overnight under some large books or a pile of magazines. This prevents any buckling and ensures a good adhesion. I would suggest having at least six or seven layers of cereal box card glued together to make a cover heavy enough to take some texture and paint. Binding the edges with masking tape helps make the cover more hard wearing, and be sure to give raw chipboard two light coats of gesso before adding paint.
3-Ring Binders:
You can also use a normal 3-ring binder as an art journal. If it has a shiny finish use some light sandpaper to rough it up a bit before adding two light coats of gesso to prepare the surface for paint.

Colour and texture

Do you like the feel and look of fabric? What about a shiny, glass-like effect? Maybe rough and sandy are more you. All of these textures can be used on the outside of a journal.
Do you want to keep your journal on a shelf with other books? Keep the dimensional effects flat so the decorations don’t get caught on other books on the shelf. Want to go all out with embellishments but not sure how to store or display your journal? I use a decorative easel :
AJ cover

How is your journal bound?

If you are working on loose pages and want to bind them all together into a book, you can use hinged rings, a DIY-binding system (e.g., the Zutter Bind-It-All or the Cinch). You will have to take the holes in the covers into account when planning what you will put on them.
Here is my Pinterest Board devoted to the covers of art journals. Have a look to get some ideas about what you like and don’t like:


Videos:

 Mixed Media Art Journal Cover using Die Cuts and Texture Paste: https://www.youtube.com/watch?v=io8y1iNrLcI


Placing a Stamped Image onto a Textured Substrate: https://www.youtube.com/watch?v=V-5XrE3tX8E


Creating Texture with Tissue Paper: https://www.youtube.com/watch?v=VDaasjYr1LU


Using Hot Glue to Create a Textured Design: https://www.youtube.com/watch?v=rmniDSZcmuw


Masking Tape to Create Texture and Making a Small Journal with a Very Simple Binding: https://www.youtube.com/watch?v=9DMwvjyQ9w0


Spiral Bound Journal Cover (flat texture): https://www.youtube.com/watch?v=A1RwFn420G8


Donna Downey Style Art Journal with a Fabric Cover: https://www.youtube.com/watch?v=0zvPsL0Y-90
This is a how to make a journal from scratch tutorial. She makes some mistakes during the making of and leaves it in to demonstrate what not to do and why, but also to show that mistakes are not the end of the world or your project, you can work around it when things go wrong!

Monday 8 June 2015

June Week Two : Stencils & Masks

Stencils and masks are one of my most loved tools. They are currently very fashionable in the art and craft world so there are as many designs as you can imagine available commercially. For the die-hard DIY'er, there is nothing more satisfying than cutting your own unique stencil, either from Mylar, overhead transparency or recycled plastic packaging.  
Many of the stencils I use regularly came straight from the recycle bin

Let’s start with how to make our own Stencils and Masks:

Lindsay the Frugal Crafter shows how to use Hot Glue:


Recycled Rubbish stencils from Jennibellie:


Julie Fei-Fan Balzer shares seven different ways to repurpose trash into tools and includes how to make a silhouette mask:


Want ideas on different ways to use these tools? They can be used with just about every medium you have! To demonstrate the versatility, here are three videos, all by Joggles:


I hope you have fun trying out some of these techniques

Monday 1 June 2015

June Week One: Doodles


Let's incorporate animals into our pages this month. A portrait of your furry, feathery or finned friend; your spirit animal; mythical monsters, they are all possibilities to kickstart a great page.

Doodling, Zentangle and Mandala


A little doodling can go a long way. It is art journalling stripped down to the bare bones: a black pen and a piece of paper. It can be added as detail to a page, or stand on its own as the entire design. Think of a simple hand drawn page border or an entire page of detailed patterns. 

Like everything, the most stunning and intricate designs represent hours and hours of practice. It is harder than it first seems, but practiced regularly (the key to it all) it is easy to master. 


Tools

I have found that most people who practice the art of Doodling in its many forms agree on two things. The best tools are:
  1. Smooth paper
  2. A black pen with a fine tip. Micron pens are by far the most popular, but use what you have.
I am going to be using a spiral bound Visual Diary/Sketch book with 110gsm paper (I think the brand is Canson) and a Stabilo felt tipped "fineliner" pen to practice my doodling.


If you are adding doodling over the top of acrylic paint, you will need to use a paint pen. DO NOT use a Copic, Sharpie or other permanent marker, the solvent or alcohol will reactivate the acrylic paint, clog the marker and make it unusable.Not a good feeling to ruin a brand new pen that cost $5.

Doodling

In Art Journalling, doodling can be spontaneous mark making, used to add detail and definition to a page, or deliberate patterns combined to create texture, or fill a space. The official Wiki definition is:

A doodle is a drawing made while a person's attention is otherwise occupied. Doodles are simple drawings that can have concrete representational meaning or may just be abstract shapes.


About Zentangle®


Zentangle ® is a brand (a Registered Trademark) that has become synonymous with doodling. 
All Zentangles are doodles, but not all doodles are Zentangles.
Definition from WikiHow:
 A Zentangle is an abstract drawing created using repetitive patterns according to the trademarked Zentangle Method.

The method applies the principles of meditation and mindfulness to drawing designs on a 3.5" square of paper. There are many books available on this particular style of doodling.


Mandala


Mandala (Sanskrit: मण्डल) means 'circle' in the Sanskrit language, and mandala art refers to symbols that are drawn, sketched or painted in a circular frame.


Whatever you want to call your drawings, a good idea is to create a simple reference sheet of marks and patterns that you can browse when your brain doesn't want to cooperate. Here are some ideas:

Friday 15 May 2015

May Week Three


Last we took a look at watercolour (or water soluble) mediums. A word that you might see on product packaging is “Aquarelle” or “Aquarellable” which will tell you that it works with water.
Because I used them in my page this week, I just want to take a second to talk about Gel Pastels. Faber Castell have a well known product called Gelatos, which come in lots of yummy colours and can be diluted or activated with water, or used straight from the tube. Gelatos are great, but while they are really easy to get in the USA, some of us in other parts of the world have trouble getting them, and they are often expensive. If you want to try Gelatos, but can’t get them or can’t afford them, I suggest you check out the kids art section in big department stores and look for Crayola's Slick Stix, or any other product that says Gel Pastels or silky smooth pastels. All the ones I have found come in some kind of twisting, lipstick-style form. They will come in a limited palette of primary and secondary colours, but you can play with them and decide if you love them enough to invest the time, effort and money into getting the more gorgeous (and trendy) Gelato colours.

 
I drew the bird onto the foam from an image I found on Pinterest. I like this technique of stamp making, it reminds me of the lino-printing I did in high school art, but without the risk of injury from the sharp cutting tools. I think I will probably end up adding a little something to the bird stamp on the page, but I haven’t worked out what he needs yet. I don’t want to lose any of the translucence of the stamp, I love that I can see the background colours through the stamped image. 


Week 3 page
Thank you to Jo Hardstaff and Maria Bozikis for the inspiration for the chevron stamp. It's my new favourite :)


The wording is what I decided I would do if I ruled the world. For me, joy comes from gratitude and is the perfect antidote to hate and jealousy. 

I'd probably give everyone a magic packet of Tim Tams as well, because arting requires energy:

And here is the best way to eat a Tim Tam (trust me):
 It's called the Tim Tam Slam. Aussie's get it.

Happy Arting!

Friday 8 May 2015

May Week Two: Watercolours

Watercolours or Water-soluables are one of my favourite supplies for journalling because they dry quick and are easy to write and draw over with most pencils and pens.

Here are some different types of water-soluble media:
Watercolour paints in tubes, they have a similar consistency to heavy body acrylics
Watercolour paints in pans that you activate with water

Liquid watercolours are really concentrated and come in bottles, usually with a dropper.
Watercolour pencils are very versatile
Water soluble crayons (these may also be labelled as water soluble pastels)

Chalk pastels can be blended dry or wet
Gel pastels (the most well known are the Faber Castell Gelatos), look and feel like a lipstick
Gouache paint is opaque watercolour
 
Derwent Inktense are water activated, but permanent when dry.

You can use them in a number of fun techniques:

    Watercolour Background
    Yes, this is card tutorial, but the technique is exactly the same no matter what size your piece of watercolour paper is, and the instructor explains what she is doing and why really clearly:
    Remember our lesson from last month on avoiding the dreaded Muddy colours? The same principles apply here, so remember purple loves blue but not orange.

    Another background technique. This produces a pretty, soft background by combining water-soluble crayons and gesso:
    Remember that just because the video shows watercolour crayons being used, doesn't mean you can't substitute other water-soluble medias. 

    Want to paint an actual picture in watercolour? Try this pretty hummingbird, she makes it looks way easy:

    GOUACHE (rhymes with SQUASH)
    In this video, artist Jennibellie paints a picture using gouache.
     
    I put this in this week's lesson as a bit of an extra because it includes a mini-tutorial on mixing a skin tone and also because Jennibellie is an awesome art journaller and recycle artist. If you are at all interested in making your own journals and art journalling on the cheap, I recommend you have a look at Jennibellie's YouTube Channel. I love her cereal box art journal tutorials in particular.

    Happy Arting!
    See you next week.

    Friday 1 May 2015

    May Week One: Make Your Own Stamps

    Welcome to May! I crown you, Queen of Your World! You have ultimate power, and a magic wand. What is most important to you? This Roadtrip prompt is about hopes and dreams and what you want your tomorrows to be like. Remember with great power comes great responsibility, so use it wisely.


    Let's make our own stamps!
    I have collected a whole bunch of videos about making stamps out of a huge rang of things. I suggest grabbing a large piece of paper to test all your new stamps on, use a bunch of different colours to test, stamp images over each other, and keep that piece of paper to use for collage or a background.

    Recycling


    Craft Foam

    Die cut craft foam


    How to make a rolling stamp


    Embossed Craft Foam

    Carving


    I am looking forward to seeing your homemade stamps in the Driver Reviver Group.
    Happy Arting!

    Tuesday 14 April 2015

    April Week Three

    Hello Beautiful Artists!
    I have loved seeing everyone embracing this month's challenge in the Driver Reviver Facebook Group. Many people are stepping out of their comfort zones and experimenting with new techniques. 

    This week I have a really easy technique for getting an artsy-looking pencil portrait onto a page without having to draw anything.

    You will need:
    • A photo with good definition and contrast: it can be a photo of yourself, or from a magazine. It can be any size, but bigger is easier. It is also easier if it is printed onto normal copier paper.
    • A piece of tracing paper
    • A soft or heavy gel medium (eg, Liquitex or Golden Matte Medium, Reeves Gloss Gel Medium).
    • A plastic card to scrape with (eg., an old loyalty or credit card)
    • Pencils: 2B graphite or soft coloured pencils + eraser
    • Masking tape, washi tape or painter's low tack tape
    • A prepared background in your journal.
    • Optional: a light box or a window
    Create a background however you would like. Here is what I did:
    I cut scraps of patterned paper into rectangles of various sizes and glued down with gel medium:
    Then I used Inktense pencils to define the edges and activated the ink with water:
    I used Inktense because once they have been activated with water, then dried, the colour is permanent. The surface of my page was also glossy because of the gel medium I used and normal watercolour wouldn't adhere to the surface. Oil pastels would also have worked.
    I was aiming for a background that was interesting without being dark or bold. I also wanted to see if the layered paper would give an interesting texture to the page.

    Once my background was ready I prepared the portrait then adhered it the background. Here is the video:

    Notes:
    • The tracing paper will wrinkle when it goes onto the glue. 
    • I have found that using gel medium results in less wrinkles than wetter glues like Mod Podge or PVA.
    • I recommend putting the glue onto the background, not onto the tracing paper. 
    • Tearing the image out of the tracing paper will feather the edges and once glued down, it will look like the image was drawn onto the background, rather than glued on.
    • Be generous with the glue.
    • Tracing paper is surprisingly tough even when it is wet from the glue. Don't be scared to scrape it firmly to get the image as flat as possible.
    Here is another example, this time traced in graphite and stuck onto a painted background:
    You can see in this close up that there are some small wrinkles in the tracing paper. I don't think you can get it completely smooth.
     The finished journal page:


    Another example of a graphite tracing of a magazine photo. It was then coloured with paint and pencils after being stuck down. You can see that the wrinkles are larger in this transfer; I used Mod Podge Matte to adhere it. Can you also see how the edges of the tracing paper are very obvious? I cut the image out with scissors instead of tearing the edges.

    I hope you will give this technique a try. If you don't have gel medium, and are wondering if it can be used for anything else, the answer is : Yes! Lots of things.
    I will be sharing other techniques in the coming months that use this specific product. Good news is that unlike paints and paper, I have found that low cost does not equal low quality when it comes to this product, so if you can find a cheaper brand to experiment with, go for it!

    Have fun with your art everyone, and I will leave you with this that I shared in the Driver Reviver Group a few days ago. I think we can all benefit from reading it again. Print it out and stick it in front of your art desk: 

    Wednesday 8 April 2015

    April Week Two: Faces

    Hello Beautiful Artists! Welcome to week Two of Self Portraits. This week I have collected several ideas on how to represent a self-portrait in different styles. Let's Go!
     
    She-Art 
    There are no rules that say your self-portrait has to have a face. I feel that this art is an act of rebellion. As women, our society and culture tell us that our faces are more valuable than our brains, our feelings, our talents and desires. I want a world were Marie Curie is an aspirational role model, not the Kardashian Klones.


    This is the signature style of American Mixed Media artist Christy Tomlinson. Her girls are often completely faceless, with simple bodies, a bright layered background and lots of scribbley doodling detail. This video shows how she sketches the basic girl:


    What I really love about this style of art is the how the words are added. The phrase is always positive and affirming and always begins with the word 'She'. I have saved a few pages of these quotes I have collected to the Driver Reviver Facebook Group for you to use in any She Art you create. The quotes are in a Word document so you can change the font and size to whatever suits you. If you are not a member of the Facebook Group, you can get a copy of it here.

    If you want a really in-depth look at how Christy creates such a layered effect on a canvas, this video is worth the 25 minutes. It is essentially a promotional video for some Pink Paislee products that are no longer available, but take notice of the techniques that are used, not the products. The video doesn't show how to create the girl, Christy uses a printed die-cut girl. But the entire point of this is to use these ideas as jumping off points for your own creations. Christy also offers her own online courses in She Art girls if this style is something that sparks your imagination!


    Poppets ®
    The ultimate no-draw self-portrait! Collage Artist and Illustrator Claudine Hellmuth uses black and white photographs of people then uses collage to make clothes and scenes for her Poppets. If you are an accountant who dreams of being an astronaut, be inspired!


    Go to this month's Pinterest Page for more examples of this style of portrait creation.

    Paint Over a Photo
    If you want to do a realistic self portrait, but don't have the drawing skills necessary to execute it, this is something to try:
    1. Print out a photo of yourself on a piece of plain printer paper. 
    2. Glue the paper to your substrate using mod podge, matte medium or a soft gel medium. Use a scraper (eg. old credit card) to get all the air bubbles out.
    3. Cover the photo with an even coat of clear gesso or matte medium.
    4. Paint over the photo, use thin translucent layers of colour to build up the picture.
    5. It's a good idea to have another copy of the photo to refer to as you paint, so you know where to put shading and highlights.
    Here is an example I did on a photo from a magazine:

    Drawing Faces
    Don't be scared of drawing faces, I promise that it is something that you can learn to do. I used to be able to draw bad stick figures with smiley-face, and now I can draw this:

    The first videos are from Dina Wakley, showing how to sketch and colour a simple front-facing portrait.

    How to Sketch a Face :
     How to Paint the Face:
    Dina has authored two Art Journal idea books.


    If drawing faces is something that you want to learn how to do, and you like a whimsical face style, I suggest you look at Tamara Laporte's free class Art, Heart and Healing delivered through her Ning site. The class is 100% free and gives very in-depth instruction on how to draw and shade a front facing portrait. Watch this video for more information on what is covered. This is the first online class I took when I started art journalling and helped me get over my mental block of "I can't draw".

    Can't wait to see what you create this week. Remember to leave me a link in the comments section if you blog. I love visiting :)

    See you in Driver Reviver!